Tree Planting Instructions
Here goes your text … Select any part of your text to access the formatting toolbar.
Tree Planting Instructions
en españolHow to Plant New Trees and Shrubs Step-by-Step in the Salt Lake Valley
On this page, Glover Nursery is here to guide you step-by-step through properly planting and caring for your trees and shrubs here in Northern Utah. Plus, some pro tree planting tips to ensure they thrive in your yard.
If you have any questions about how to plant trees, don’t hesitate to reach out through our Plant Diagnosis / Warranty Inquiry page. We respond quickly!
Note: All eligible shrubs and trees purchased from Glover Nursery must be planted and watered in accordance with our guidelines for the 1-year warranty to remain valid. Please refer to our Warranty Policy page for more information.
Tree Planting Tips for Northern Utah
The Salt Lake Valley has a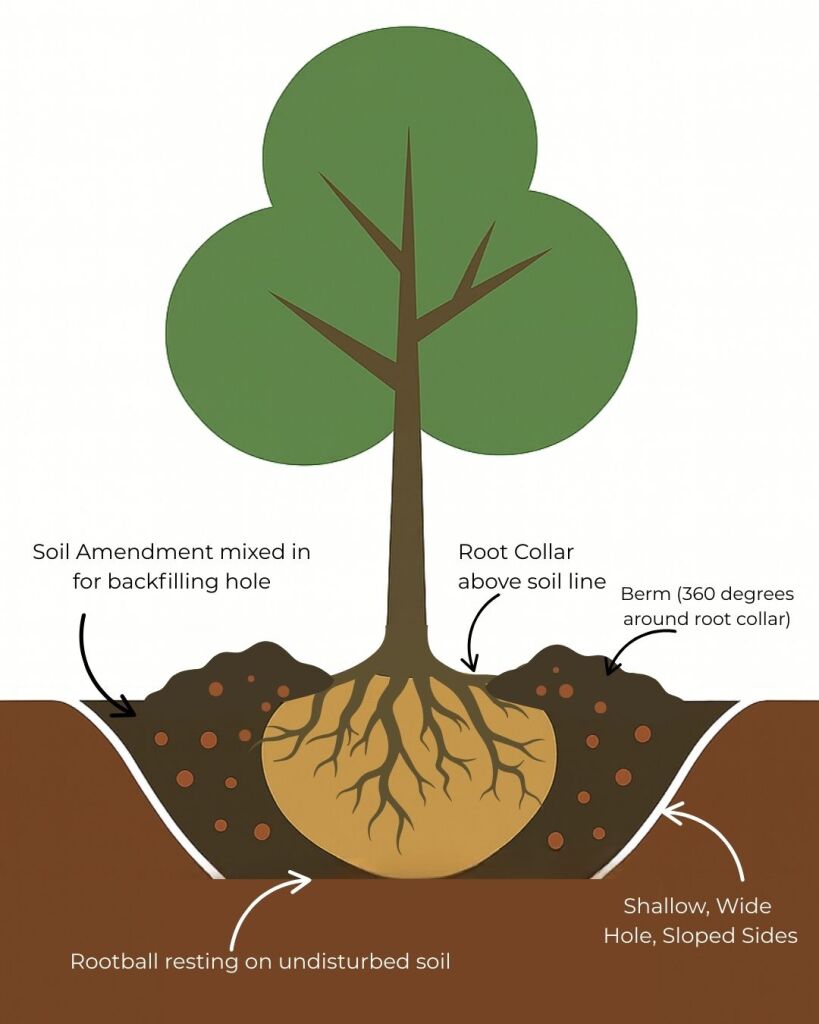 unique soil composition. Therefore our trees and shrubs can grow best when planted with the following instructions from Glover Nursery.
Digging The Hole
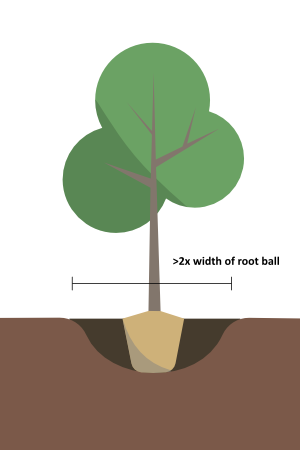
Dig a wide, shallow hole the same depth and at least twice as wide as the root-ball.
Score or scratch the sides of the hole to enable the roots to penetrate the sides and grow into the existing soil.
How Deep to Plant Trees
First of all, do not plant too deep! The root ball should rest on undisturbed soil to prevent settling too deep and covering the top of the root-ball after being planted.
If you dug too deep, put the extra soil and back it down firmly before placing the root-ball.
The first woody roots at the top of the soil ball should be just barely covered with soil. This area of the plant is known as the root flare or root collar, and burying it under too much soil will lead to the plant dying as soon as 2 years, but could take up to 5-6 years.
Prepping The Plant/Root Ball
Properly preparing your plant before it goes into the ground is key to preventing transplant shock and helping it thrive. Follow these steps to get your tree or shrub ready for planting:
- Water the Root Ball Before Planting to Prevent Transplant Shock
- While the plant is still in its container, give the roots a deep soak.
- For smaller containers, set the plant in a bucket of water for about 20 minutes.
- For larger plants, run the hose slowly over the soil surface until the entire root ball is saturated.
- Wet root balls can be very heavy. For larger plants put the root ball in the pre dug hole before watering the root ball.
- While the plant is still in its container, give the roots a deep soak.
- Remove the Plant Carefully
- Always lift the tree or shrub by the root ball, not the trunk.
- If it’s too heavy to lift, gently roll it on its side and slide off the container.
- DO NOT bounce, crack, cut or break the root ball.
- Always lift the tree or shrub by the root ball, not the trunk.
- Loosen Circling Roots (If Present)
- If you notice roots circling the outside, gently loosen them before planting.
- Do not cut or tear into the root ball as you might with annuals—this can seriously damage the tree or shrub and may result in it dying very quickly. Doing so will void any applicable warranty.
- If you notice roots circling the outside, gently loosen them before planting.
- Set the Root Ball Into the Hole
- Ease the plant into the hole slowly to keep the root structure and surrounding soil intact.
- For Balled & Burlapped (B&B) Trees
- Center the root ball in the hole and make sure the tree is straight from all angles. Do a walk around and visually confirm.
- Do not straighten the tree by pulling on the trunk as this can break the tree. Always shift the tree from the root ball.
- Cut and remove all twine.
- Pull the burlap back from the trunk and trim away as much as possible from the sides, but leave the bottom layer in place.
- Roots will grow through the burlap, but removing excess material prevents air pockets that could cause the tree to lean or shift.
- If Your Tree Has a Wire Basket
- Use a hacksaw or bolt cutters to cut the wire halfway down, or bend it back so no wire sticks up above soil level.
- It’s okay to leave the bottom portion of the wire basket in place, it will rust away, but remove as much as possible for best results.
PRO TIP: It is better to leave the lower segment of burlap as well as the wire basket on the tree than risk the root ball fall apart when planting as that will severely stress, and likely kill, the tree.
- Use a hacksaw or bolt cutters to cut the wire halfway down, or bend it back so no wire sticks up above soil level.
- Remove All Packaging Materials
- Take off any strings, tags, twine, or stakes attached to the trunk.
- These smaller tree stakes are only meant for transport and can weaken the trunk if left on, making it more prone to breaking later.
- Take off any strings, tags, twine, or stakes attached to the trunk.

If Using MYKE Mycorrhizal
- For tree planting instructions, including MYKE products, spread the calculated amount of MYKE directly onto the root-ball. DO NOT BREAK THE ROOT-BALL.
- Patting it (rather than shaking it from the container) onto the root-ball will make it stick more effectively.
- The MYKE product must come in direct contact with the roots or the outer surface of the root-ball.
- Plants in fiber pots that are not fully rooted in may be left in the pot:
- Trim the rim of the fiber pot off below the soil level.
- Mix some MYKE around the inside edge of the fiber pot.
- Place the rest of the MYKE in the soil immediately next to the outside of the pot.
Backfilling the Hole and Settling the Soil
Once your tree or shrub is in position, it’s time to fill in the hole and help it settle securely into its new home. Follow these steps carefully to give your plant the best start:
- Confirm the Tree’s Placement
- Before adding soil, double-check that the tree is centered and standing straight.
- View it from several angles to make sure it looks balanced in the space.
- Do not straighten the tree by pulling on the trunk of the tree. Always move it by adjusting the root ball
- PRO TIP: place a shovel under the rootball and use the handle shovel as a lever to lift. Gently push a bit of soil under the lifted area to help stabilize the small adjustments for a straight tree.
- Before adding soil, double-check that the tree is centered and standing straight.
- Add Water While You Backfill
- Place a garden hose in the bottom of the hole beside the root ball.
- Turn the hose on to a slow stream—enough to fill the basin as you add soil, but not so strong that it washes soil away.
- Backfill with the Recommended Soil Mix
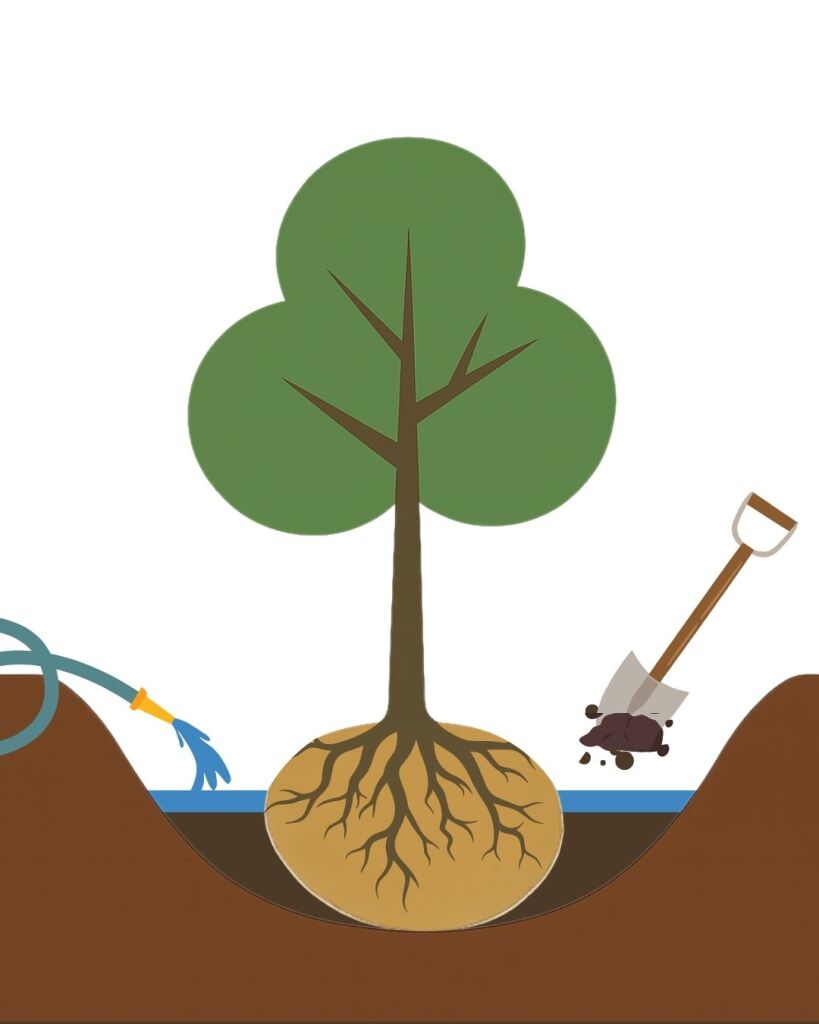

- Use the soil mix suggested for your soil type (the content of Northern Utah soils vary quite a bit, so a specific mix for your soil type is recommended below).
- Allow the running water to fill the hole, then remove the hose and let the water drain completely.
- This step settles the soil naturally—avoid tamping or stepping on the root ball, which can damage the roots and cause transplant failure.
- Check Alignment Again
- After the soil settles, look at the tree from all sides to ensure it’s still straight.
- Add more soil if needed to finish backfilling the hole.
- Shape the Soil Surface
- The top of the root ball (also known as the root flare) should remain slightly visible above the soil line.
- Slope the soil gently away from the trunk so water flows outward, not toward the base of the trunk.
- Build a Watering Berm
- Create a small berm—a ring of soil about 3–4 inches high—around the outside edge of the hole.
- This helps direct water toward the root ball during watering.
- After one year, rake the berm away to allow for natural drainage.
- Water Thoroughly to Settle the Soil
- Turn the hose back on to a gentle flow and let the water bubble up until the soil surface is saturated.
- Allow it to drain completely, then repeat this process two more times.
- This ensures the soil is fully settled and the tree remains straight and stable and the soil has settled.
- Apply Mulch Properly
- Spread loose, chunky mulch such as bark or Soil Pep over the area above the root ball.
- Keep mulch 3-5 inches away from the base of the trunk as well as any lower branches—covering them can attract insects, trap moisture, and cause fungal problems. This can lead to many issues with insect infestation as well as fungal issues or harboring of diseases.
When to Plant Trees in Northern Utah
Here at Glover Nursery we’re fond of saying, “if you can dig, you can plant!” Common answers state the best times to plant trees in Northern Utah are spring and fall—when temperatures are mild and the soil is workable. But this is not a hard and fast rule. While there are minor benefits to planting in certain seasons, you really can plant any time of year. If you know where you want a tree, and that tree is available, better to plant it now and start enjoying the benefits than waiting until the tree is in someone else’s yard.
- Spring planting (April through mid June) is generally cooler, meaning less risk of transplant shock and more comfortable conditions for people to be outdoors.
- Fall planting (September through mid November) is often preferred because cooler weather reduces the risk of transplant shock and also puts plants in the ground when they are doing 80% of their rooting, which really helps with establishing a new plant.
If you want instant shade in the middle of summer you can plant, you’ll just need to be very aware of your watering schedule. We recommend you check in with one of our experts at the nursery and they will be able to help you with the best practice for planting a tree in the heat of summer.
The only time we recommend that you avoid planting is when the ground is frozen. The reason: you can’t dig into frozen soil.
By following our planting instructions you give your tree the best chance to settle in, develop a healthy root system, and thrive in Utah’s unique climate.
Recommended Soil Amendments for Salt Lake Valley
Salt Lake Valley gardeners have a unique challenge when it comes to our soil. Some gardeners will have clay soil, some sandy, some loamy while still other yards here in the Salt Lake Valley may have a mix. This is because our great valley used to be the home of Bonneville Lake.
If you already know your soil type, use the recommended soil amendments below. If you don’t know, we recommend you do a soil test with USU Extension or check out this soil class that was taught by one of our team members. There is a lot of great information here that will help you understand your soil better.
- CLAY SOIL needs help with drainage as well as repairing and preventing soil compaction. We recommend any of the following soil amendments:
- SANDY SOIL needs help with moisture and nutrient retention. We recommend blends containing peat moss, or coconut coir, such as:
- Both types of soil will benefit from adding Acid Planting Mix due to the alkaline nature of our soils in Utah. While this will not counteract the overall pH of your soil, adding a bit of acidity does help while new, tender roots grow.
Soil amendment mix ratios for backfilling the hole
- Mix the appropriate amendment for your soil type with the soil that was removed from the hole.
- Ratio of mix for backfilling the hole should be approximately 20-30% amendment to 70-80% existing soil.
- You want to use a majority of your native soil to help the roots acclimate to your specific soil condition as they grow. The amendment blended in will assist with moisture management, nutrient uptake as well as to combat compacted soil (which, if you have a home that was built using tractors, trucks, trailers or any other heavy equipment, you do have compacted soil) Learn more here.
Digging The Hole
Dig a wide, shallow hole the same depth and at least twice as wide as the root-ball.
Score or scratch the sides of the hole to enable the roots to penetrate the sides and grow into the existing soil.
Do Not Plant Too Deep
The root ball should rest on undisturbed soil to prevent settling too deep and covering the top of the root-ball after being planted.
If you dug too deep, pack the extra soil back quite firmly before placing the root-ball.
The first woody roots at the top of the soil ball should be just barely covered with soil.
Prepping The Plant/Root Ball
- Saturate the root-ball while it is still in container.
- Remove root-ball from the container. Do not handle the plant by the trunk. Lift the tree/shrub by root-ball or use the wire basket.
- Do not bounce, crack, or break the root-ball.
- EASE the root-ball into the hole gently so as not to break the soil around the roots.
- Balled and Burlapped (B&B) trees need to be:
- Centered in the hole
- Twine cut and removed
- Burlap cut halfway down from the top of the root-ball and removed.
- Wire baskets should be cut with hacksaw or bolt cutters halfway down or bent back so no wire sticks up above soil level. You may leave the bottom of the wire basket on the root ball.
- Remove any string or tags tied around the trunk or branches.
If Using MYKE Mycorrhizal:
- For planting and watering instructions, including MYKE products, spread the calculated amount of MYKE directly onto the root-ball. DO NOT BREAK THE ROOT-BALL.
- Patting it (rather than shaking it from the container) onto the root-ball will make it stick more effectively.
- The MYKE product must come in direct contact with the roots or the outer surface of the root-ball.
- Plants in fiber pots that are not fully rooted in may be left in the pot:
- Trim the rim of the fiber pot off below the soil level.
- Mix some MYKE around the inside edge of the fiber pot.
- Place the rest of the MYKE in the soil immediately next to the outside of the pot.
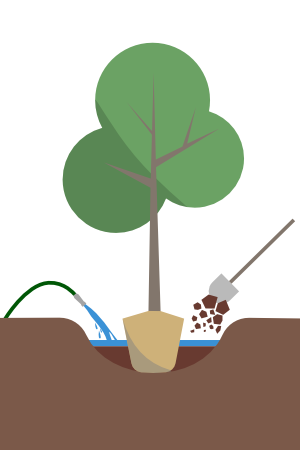
Backfilling Hole & Settling Soil
- Place a garden hose at the bottom of the hole next to the root-ball (turn the water on in step 6.)
- Backfill hole with the recommended soil mix.
- Apply water and the Root Starter mixture to completely saturate the root ball and the soil mix.
- Soil should slope gently away from the trunk with the very top of the root-ball slightly visible after planting.
- Build up a rim of soil at the edge of the root-ball to direct water to the roots.
- The rim of soil should be raked away after one year.
- Turn the hose on a gentle flow and allow the water to bubble up to the surface until the soil is saturated, then remove the hose from the hole.
Loose, chunky mulch, such as bark, may be placed around the plant. Do not allow any of the mulch to touch the trunk or to bury any of the lower branches.
Recommended Soil Amendments
- CLAY SOIL needs help with drainage and preventing soil compaction. We recommend any of the following soil amendments:
- Soil Building Conditioner
- Soil Pep
- Nutrimulch
- Organic Compost
- Garden Mix
- SANDY SOIL needs help with moisture retention. We recommend blends containing peat moss such as:
- Planting Mix
- Rich & Complete
- Both types of soil will benefit from adding Acid Planting Mix due to the alkaline nature of our soils in Utah.
Soil Mix For Planting
- Mix the appropriate amendment for your soil type with the soil that was removed from the hole.
- Ratio of mix for backfilling the hole should be approximately 20-30% amendment to 70-80% existing soil.
Watering Instructions for Newly Planted Trees (First 3 Months)
- Sprinkler water is not enough for newly installed trees and shrubs.
- We highly recommend hand watering new trees and shrubs through the first two growing seasons for the proper establishment of the root system.
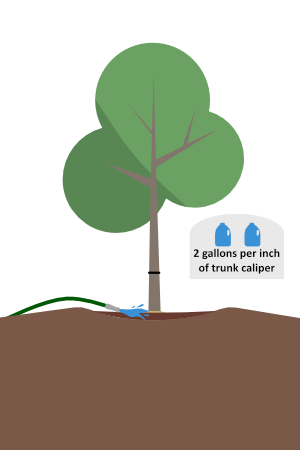
- Deep soak by turning on a hose to a slow trickle and place the nozzle within the basin until the soil is completely saturated. Soak time will vary according to the size of the root-ball.
- Two (2) gallons of water per inch of trunk caliper are required for each watering.
- All new plants require deep soaking 2-3 times per week (depending on weather and temperature) for the first three months.
Second Growing Season
Deep soak trees and shrubs twice monthly, in addition to sprinkler watering.
Plants grown in clay soil need less frequent watering than those in sandy soil.
Important Winter Watering
- Monthly deep soaking of trees and shrubs during winter is necessary unless there is frequent snow or rain.
- Deep soak all trees and shrubs just prior to the onset of winter, around Thanksgiving. Then, water once per month through the winter season.
- Use National Holidays as an easy way to remember when to water.
Glover Pro Tips:
Deep Soaking
- Get a 5 gallon bucket and drill a small hole in the bottom center (use a 1/8″ bit). Place the bucket close to the tree, fill with water and leave it until the water drains out. The small hole means the water won’t leak out too fast while ensuring those roots get the deep moisture they need.
- For smaller trees/shrubs, use 2-3 times per week during the first growing season. 1-2 times per week for the second growing season.
- For larger trees, fill two buckets 2-3 times per week during the first growing season (or, fill the same bucket 2 times, just move it to the other side of the tree for the second time). 1-2 times per week for the second growing season.
Winter Watering
- This should be done from October through March. Use National Holiday dates as an easy way to remember when your next date for soaking should happen.
- Here are a few ways to make this an easy chore:
- Place approximately 32 oz. of ice around the root-ball once a month (twice a month for larger trees) to ensure the soil has enough moisture for the root system during the winter months.
- Use a 5 gallon bucket method described above.
- If the weather is nice, pull the hose out of storage and let it run over the root ball area on a slow trickle (so it gently absorbs into your soil instead of running off from high water flow pressure).
Frequently Asked Questions About Tree Planting in Utah
Below are answers to some of the most common questions our Utah customers ask about planting new trees and shrubs. These tips come straight from the experts at Glover Nursery in West Jordan, Utah—your local source for tree and shrub planting instructions.
Do you need to stake new trees?
In most cases, you don’t need to stake new trees. Glover Nursery recommends staking only when trees are planted in areas with strong or consistent winds that prevent them from standing upright on their own. We do not recommend staking all new trees.
Staking can actually hinder a tree’s natural development, keeping the trunk from growing strong enough to support its canopy.
If staking is necessary:
- Place the stake on the side facing the wind.
- Tie the trunk loosely so it can still move slightly.
A little movement helps the tree build strength—too much restriction can cause damage or even break the trunk.
When to Plant Trees?
At Glover Nursery, we like to say, “If you can dig, you can plant!”
The most common times to plant trees in Utah are spring (April–June) and fall (September–November), when temperatures are milder and it is more pleasant to be outside. In the spring, selection of inventory is generally higher and the temperatures are cooler, which does reduce the risk of transplant shock. In the fall, plants do the majority of their rooting which does mean you are getting a jump start on root establishment.
But, you can absolutely plant in the summer, or even the winter. If you can dig, meaning the ground isn’t frozen, you can plant.
In all instances, you will need to pay attention to the watering needs of the new plant. Even drought tolerant plants need “establishment watering” while the root system develops, which can take 2-3 growing seasons.
How Close to Plant Trees?
Proper spacing between trees is essential for healthy growth. The distance depends on the mature size of the tree and its purpose in your landscape:
- Shade trees: 15-40 feet apart
- Check the expected width of the mature canopy, this information will be on the tag of the tree, and use that as a guide. If it gets to be 12 feet wide, you will want to plant your trees at least 12 feet apart so each side of the tree’s canopy has room to fully develop.
- Ornamental or flowering trees: 10–20 feet apart
- Evergreens or privacy screens: 6–12 feet apart
Always check each tree’s mature width and allow enough room for roots and branches to spread naturally. Planting too close together can lead to competition for light, water, and nutrients, resulting in weaker trees over time. But, if you are creating a privacy screen, planting just a bit inside the mature width of the plant will help to ensure foliage density to achieve your privacy goals.
When in doubt, reach out to our expert gardeners here at Glover Nursery through our Plant Diagnosis / Warranty Inquiry page. We respond quickly!
How Deep to Plant Trees?
Planting depth is key to long-term survival. The root flare (also called the root collar) should sit slightly above ground level—never buried. The top of the root ball should be just above the surrounding soil about 1”. Planting too deep suffocates roots and leads to rot, while planting too shallow can cause instability.
If you accidentally dig too deep, fill in the extra soil at the bottom of the hole and pack it firmly before setting the root ball. Always ensure the tree sits on solid, undisturbed ground to prevent settling.
Should I cut off girdling roots/root ball?
No, you should not cut into or remove roots from the root ball. For most trees and shrubs, this can cause serious damage and may even kill the plant.
If you notice circling or girdling roots, gently loosen them before planting to encourage healthy outward growth.
Avoid the technique often used on annuals where the root ball is cut or sliced—trees and shrubs need their root structure kept intact for proper establishment.
Should I stomp on the soil to settle it?
No, avoid stomping or tamping the soil around your newly planted tree. This can compact the soil and damage the root ball, preventing proper root growth.
Instead, let water do the work—fill the hole with water after backfilling, let it drain, and repeat. This gently settles the soil around the roots without causing harm.
These are just a few of the best practices to get you started planting your tree here in Northern Utah. For more in-depth tree planting instructions, we invite you to visit the store and speak with one of our horticulturists or expert gardeners.
If you’re looking for more helpful resources, check out our other guides by clicking the button below to ensure year-round care for your plants, shrubs, and trees.